
- pom.xml 添加:
<dependency>
    <groupId>com.h2database</groupId>
    <artifactId>h2</artifactId>
    <scope>runtime</scope>
    <version>1.4.199</version>
</dependency>
1
2
3
4
5
6
2
3
4
5
6
- SpringBoot 配置:
spring:
  datasource:
    driver-class-name: org.h2.Driver
    # url: jdbc:h2:file:./db/test       # 以本地文件存储数据的方式使用H2数据库
    # 以内存方式使用数据库(这里会创建一个数据库名为 test 的数据库实例)
    url: jdbc:h2:mem:test
    username: sa
    password: sa
  h2:
    console:
      # 是否允许网页访问,默认false
      enabled: true
      # h2数据库的访问路径:http://localhost:8080/h2(默认为/h2-console)
      path: /h2
      settings:
        # 是否允许从其他地方访问,还是只允许从本地访问
        web-allow-others: true
1
2
3
4
5
6
7
8
9
10
11
12
13
14
15
16
17
2
3
4
5
6
7
8
9
10
11
12
13
14
15
16
17
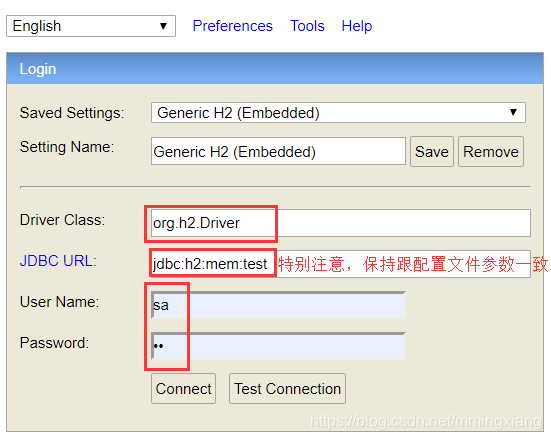
启动SpringBoot程序。
打开浏览器访问:http://localhost:8080/h2
出现连接界面,特别注意:JDBC URL参数,SpringBoot默认为 jdbc:h2:~/test ,需要修改为SpringBoot配置文件一致的参数。
# H2 数据库 URL 说明
数据库支持多种连接模式和连接设置,不同的连接模式和连接设置是通过不同的URL来区分的,URL中的设置是不区分大小写。
| Topic | URL Format and Examples |
|---|---|
| 嵌入式(本地)连接 (opens new window) | jdbc:h2:[file:][<path>]<databaseName> jdbc:h2:~/test jdbc:h2:file:/data/sample jdbc:h2:file:C:/data/sample (Windows only) |
| 内存数据库(私有) (opens new window) | jdbc:h2:mem: |
| 内存数据库(被命名) (opens new window) | jdbc:h2:mem:<databaseName> jdbc:h2:mem:test_mem |
| 使用TCP/IP的服务器模式(远程连接) (opens new window) | jdbc:h2:tcp://<server>[:<port>]/[<path>]<databaseName> jdbc:h2:tcp://localhost/~/test jdbc:h2:tcp://dbserv:8084/~/sample |
| 使用SSL/TLS的服务器模式(远程连接) (opens new window) | jdbc:h2:ssl://<server>[:<port>]/<databaseName> jdbc:h2:ssl://secureserv:8085/~/sample; |
| 使用加密文件 (opens new window) | jdbc:h2:<url>;CIPHER=[AES|XTEA] jdbc:h2:ssl://secureserv/~/testdb;CIPHER=AES jdbc:h2:file:~/secure;CIPHER=XTEA |
| 文件锁 (opens new window) | jdbc:h2:<url>;FILE_LOCK={NO|FILE|SOCKET} jdbc:h2:file:~/quickAndDirty;FILE_LOCK=NO jdbc:h2:file:~/private;CIPHER=XTEA;FILE_LOCK=SOCKET |
| 仅打开存在的数据库 (opens new window) | jdbc:h2:<url>;IFEXISTS=TRUE jdbc:h2:file:~/sample;IFEXISTS=TRUE |
| 当虚拟机退出时并不关闭数据库 (opens new window) | jdbc:h2:<url>;DB_CLOSE_ON_EXIT=FALSE |
| 用户名和密码 (opens new window) | jdbc:h2:<url>[;USER=<username>][;PASSWORD=<value>] jdbc:h2:file:~/sample;USER=sa;PASSWORD=123 |
| 更新记入索引 (opens new window) | jdbc:h2:<url>;LOG=2 jdbc:h2:file:~/sample;LOG=2 |
| 调试跟踪项设置 (opens new window) | jdbc:h2:<url>;TRACE_LEVEL_FILE=<level 0..3> jdbc:h2:file:~/sample;TRACE_LEVEL_FILE=3 |
| 忽略位置参数设置 (opens new window) | jdbc:h2:<url>;IGNORE_UNKNOWN_SETTINGS=TRUE |
| 指定文件读写模式 (opens new window) | jdbc:h2:<url>;ACCESS_MODE_LOG=rws;ACCESS_MODE_DATA=rws |
| 在Zip文件中的数据库 (opens new window) | jdbc:h2:zip:<zipFileName>!/<databaseName> jdbc:h2:zip:~/db.zip!/test |
| 兼容模式 (opens new window) | jdbc:h2:<url>;MODE=<databaseType> jdbc:h2:~/test;MODE=MYSQL |
| 自动重连接 (opens new window) | jdbc:h2:<url>;AUTO_RECONNECT=TRUE jdbc:h2:tcp://localhost/~/test;AUTO_RECONNECT=TRUE |
| 自动混合模式 (opens new window) | jdbc:h2:<url>;AUTO_SERVER=TRUE jdbc:h2:~/test;AUTO_SERVER=TRUE |
| 更改其他设置 (opens new window) | jdbc:h2:<url>;<setting>=<value>[;<setting>=<value>...] jdbc:h2:file:~/sample;TRACE_LEVEL_SYSTEM_OUT=3 |
- 使用 JAVA 代码的方式启动tcp h2数据库
import lombok.extern.slf4j.Slf4j;
import org.h2.tools.Server;

import java.sql.SQLException;

@Slf4j
public class H2Server {

    private static Server server;

    private static final String port = "9999";

    public static void start() throws SQLException {
        server = Server.createTcpServer(new String[]{"-tcp", "-tcpAllowOthers", "-ifNotExists", "-tcpPort", port})
                .start();
        log.info(server.getURL());
    }

    public static void stop(){
        if(server != null){
            server.stop();
        }
    }

    public static void main(String[] args) {
        try {
            H2Server.start();
        } catch (SQLException e) {
            e.printStackTrace();
        }
    }
}
1
2
3
4
5
6
7
8
9
10
11
12
13
14
15
16
17
18
19
20
21
22
23
24
25
26
27
28
29
30
31
32
2
3
4
5
6
7
8
9
10
11
12
13
14
15
16
17
18
19
20
21
22
23
24
25
26
27
28
29
30
31
32
Q: 应用程序连接时如何配置?
spring:
  datasource:
    driver-class-name: org.h2.Driver
    url: jdbc:h2:tcp://localhost:9999/./h2/test;AUTO_SERVER=TRUE;DB_CLOSE_ON_EXIT=FALSE;MODE=MYSQL
    username: sa
    password:
1
2
3
4
5
6
2
3
4
5
6